Blogging from Drafts
As is the current style, my blog went dead for a long time. Trying to jumpstart that, microblogging seemed like it might inject some fun into the process. Especially if I got to learn some new tooling.
Mostly, I wanted posting to be easy. Very easy. As in “launch Drafts, write some text, run an action, done.”
What do we need for that?
- Generate the YAML header needed for my Jekyll-based blog
- Create a filename matching Jekyll’s needs, as well
- Add that file to the
_postsfolder in the blog’s GitHub repo - Update the blog content based on the repo.
Number 4 was stupidly easy - I moved my blog to Netlify. Boy does that ever “just work”.
The rest is handled via a Drafts action that runs a single script step. That step looks like this, in full:1
const credential = Credential.create("GitHub blog repo", "The repo name, and its credentials, hosting the Jekyll blog.");

credential.addTextField("username", "GitHub Username");
credential.addTextField('repo', 'Repo name');
credential.addPasswordField("key", "GitHub personal access token");

credential.authorize();

const githubKey = credential.getValue('key');
const githubUser = credential.getValue('username');
const repo = credential.getValue('repo');

const http = HTTP.create(); // create HTTP object
const base = 'https://api.github.com';


const txt = draft.content;
const posttime = new Date();

const datestr = `${posttime.getFullYear()}-${pad(posttime.getMonth() + 1)}-${pad(posttime.getDate())}`;
const timestr = `${pad(posttime.getHours())}:${pad(posttime.getMinutes())}`;
const slug = String((posttime.getHours() * 60 * 60) + (posttime.getMinutes() * 60) + posttime.getSeconds());

const fn = `${datestr}-${slug}.markdown`;

const link = getLink();

const yaml = {
    layout: 'post',
    date: `${datestr} ${timestr}`,
    category: 'micropost',
    title: '""'
};

if (link) {
    yaml.linkURL = link;
}

let preamble = "---\n";

for (const f in yaml) {
    preamble += `${f}: ${yaml[f]}\n`;
}

preamble += "---\n\n";

const doc = `${preamble}${txt}`;

const options = {
    url: `https://api.github.com/repos/${githubUser}/${repo}/contents/_posts/${fn}`,
    method: 'PUT',
    data: {
        message: `micropost ${datestr}`,
        content: Base64.encode(doc)
    },
    headers: {
        'Authorization': `token ${githubKey}`
    }
};

var response = http.request(options);

if (response.success) {
    // yay
} else {
    console.log(response.statusCode);
    console.log(response.error);
}

function pad(n) {
    let str = String(n);
    while (str.length < 2) {
        str = `0${str}`;
    }
    return str;
}


function getLink() {
    var p = Prompt.create();

    p.title = 'External link';
    p.message = 'If this is a link post, we need a link.';

    p.addTextField('externalLink', 'Link', '');

    p.addButton('Use');
    p.addButton('Nope');

    const didSelect = p.show();

    const link = p.fieldValues.externalLink;

    if (link && p.buttonPressed == 'Use') {
        return link;
    }

    return null;
}
Some of the headers are related to microposting (via micro.blog) and
linkblogging; those are outside of the scope of this post, but I might babble
about them at a later date. Removing the linkURL and category bits will
do you no harm. You would need to add something to generate filenames from
a post’s title (rather
than the simple numeric slug used here, since microposts don’t have titles).
The fun part is when we post to GitHub. You’ll find plenty of examples related to posting via Working Copy, but that seems like overkill when all we’re doing is adding a file to GitHub. Don’t they have an API for that?
Yes, they do.
To use it, you’ll need to generate a Personal Access Token with “repo” privileges, like so:
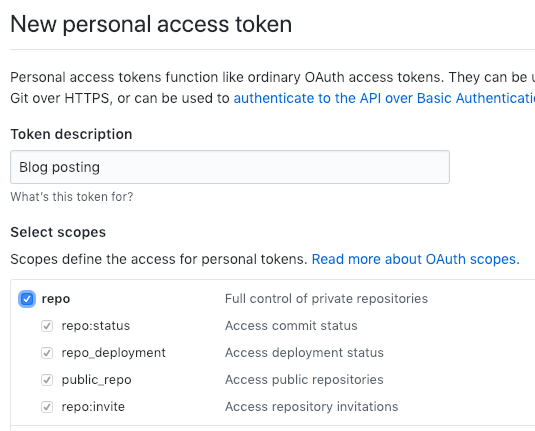
Make note of that token when it’s created (ideally in your favorite password manager). You’ll need it when you first run the action.
In order to post, the script:
- Creates a Base64-encoded version of your draft text (including the front matter)
- Uses that as the
contentportion of the JSON required by GitHub’s API - Uses Drafts’ HTTP.request method to post to GitHub
Since not just anyone can post to your repo, we need to include some authentication details.
Drafts’ Credential class helps us here.
const credential = Credential.create("GitHub blog repo", "The repo name, and its credentials, hosting the Jekyll blog.");

credential.addTextField("username", "GitHub Username");
credential.addTextField('repo', 'Repo name');
credential.addPasswordField("key", "GitHub personal access token");

credential.authorize();

const githubKey = credential.getValue('key');
const githubUser = credential.getValue('username');
const repo = credential.getValue('repo');
The first time this is run, you’re prompted for:
- Your GitHub username (“paulroub” in my case)
- The repo you’re posting to (“roubdotnet” for me)
- And the Personal Access Token we created earlier
We pass those values along as part of the API request:
const options = {
    url: `https://api.github.com/repos/${githubUser}/${repo}/contents/_posts/${fn}`,
    method: 'PUT',
    data: {
        message: `micropost ${datestr}`,
        content: Base64.encode(doc)
    },
    headers: {
        'Authorization': `token ${githubKey}`
    }
};

var response = http.request(options);
The next time you run this action, Drafts will remember the credentials, and won’t need to prompt you again.